

 ChatGPT
 Perplexity
 Claude
 Gemini
 Grok
Grok
Your well pump is running but little or no water is coming out. That is almost always a lost prime, and if you have a jet pump or shallow well pump, you can fix it yourself in about 15 minutes with a bucket of clean water. Priming a well pump means filling the pump housing and suction line with water so the pump can create suction and move water again. Without water in the system, the pump spins uselessly against air.
At NightOwl Monitoring, we work with well drillers and private well owners across the country, and lost prime is one of the most common urgent calls we see. Understanding how to handle it fast, and how to prevent it from happening repeatedly, is knowledge every well owner needs.
This guide covers how to prime a well pump step by step for every common situation: shallow well jet pumps, setups with a pressure tank, deep well systems, power outage recovery, and what to do when the pump refuses to catch prime.
Key Takeaways
- Water wells can last for decades with proper maintenance.
- Well lifespan depends on construction, water quality, usage, and maintenance.
- Pumps and other components may need replacement before the well itself.
- Pressure tanks, pipes, and electrical parts can wear out over time.
- Changes in water pressure can indicate system problems.
- Regular inspections help identify issues early.
- Proper maintenance can extend the life of the well system.
- Well monitoring can help detect problems before major failures occur.
What Does Priming a Well Pump Mean?
A jet pump creates suction by spinning an impeller at high speed. For that suction to work, the pump housing and the pipe running down to the well must be completely filled with water. There can be no air gaps. When air replaces the water in that column (because of a power outage, a leaking valve, low well water, or recent work on the system), the pump spins but cannot grab onto the air well enough to pull water up. The pressure gauge stays flat. No water flows.
Priming restores that water column. You fill the housing manually, seal it, start the pump, and the pump takes over from there.
This is why you need to prime a well pump:
- Power outage caused the check valve to leak down, letting air into the suction line
- The well ran low and the pump pulled air instead of water
- A suction-side fitting, pipe, or seal developed a small air leak
- The foot valve at the bottom of the well is failing and not holding water
- You just installed the pump or did plumbing work that broke the water column
- The pump sat unused (vacation property, seasonal shutdown) and drained
Which Well Pumps Need Priming?
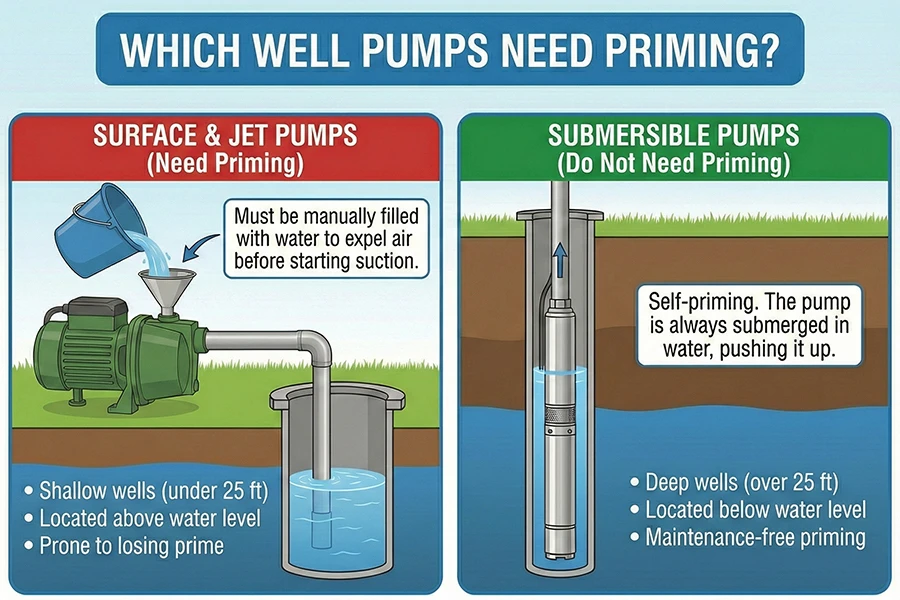
Before you grab a bucket, confirm you have the right pump type. Priming only applies to certain configurations.
Shallow Well Jet Pump (most common priming situation)
If you have an above-ground pump mounted near a pressure tank, you almost certainly have a shallow well jet pump. These are the pumps that most commonly need priming. They rely on a continuous water column from the pump down to the well to function. Shallow well jet pumps typically serve wells no deeper than 25 feet.
Convertible or Deep Well Jet Pump (two-pipe system)
Some jet pumps are configured as “convertible” or deep-well jet setups that use two pipes running down the well, one to push water toward an injector and one to return water to the pump. These can be primed similarly to shallow well pumps, but you may need to fill both pipes, and the process takes significantly more water because the suction lines are longer. Some convertible pumps have two prime plugs.
Deep Well Submersible Pump (usually no manual priming needed)
If your pump is installed deep inside the well casing underwater, it is a submersible pump. Submersible pumps do not need manual priming because they are already surrounded by water. If you have no water with a submersible pump, the problem is almost never lost prime. Focus instead on:
- Breaker tripped or control box fault
- Pressure switch failure
- Low water cutoff activated
- Pressure tank problem
- Broken drop pipe or wiring underground
- Well water level dropped below the pump intake
Self-Priming Pumps
A self-priming pump is designed to handle some air and re-establish prime on its own after short interruptions. However, even self-priming pumps can lose prime during extended power outages if the check valve has leaked down significantly. If a self-priming pump fails to recover on its own after a power outage, manual priming is the correct next step.
What You Need Before You Start
Gather these before touching the pump:
- 1 to 2 gallons of clean water for a shallow well. Have 5 gallons ready for a deep well jet pump or a long suction line.
- A clean bucket or pitcher (a garden hose works if you have a water source)
- A funnel (optional but helpful to avoid spilling near electrical components)
- An adjustable wrench to remove the prime plug
- Teflon tape in case the prime plug threads need refreshing
- A rag or towel for spills
- A flashlight if working in a dim pump house or basement
Water quality matters. Use clean tap water, water from a sealed container, or water from your hot water tank as an emergency source. If you have no clean water on hand after a power outage, draining a gallon from the hot water heater tank is a practical option. Avoid water with visible debris or sediment, as particles can damage pump impellers.
How to Prime a Shallow Well Pump: Step by Step
This is the procedure for the most common scenario: an above-ground jet pump serving a shallow well, with or without a pressure tank.
Step 1: Turn Off Power at the Breaker
Go to your electrical panel and switch off the breaker labeled for the well pump. Well pumps typically run on 240 volts. Do not assume the pump is off just because it is not running. Verify it by trying to trigger the pressure switch manually or using a voltage tester. This step is not optional.
Step 2: Open a Faucet Near the Pressure Tank
Find a hose bib or faucet close to the pump or pressure tank and open it fully. Leave it open throughout the priming process. This does two things: it releases any residual pressure in the system before you open the prime plug, and it gives air an exit path once the pump starts.
Step 3: Locate the Prime Plug
Look on the top or front face of the pump housing for the prime plug. It is typically a square-head or hex-head plug, usually 3/4 inch or 1 inch, sometimes labeled “PRIME” directly on the housing. Some pumps use a dedicated priming port or a small valve instead of a threaded plug. If you cannot find it, check your pump’s owner manual or look for the most accessible plug on the top of the pump body (not on the plumbing lines).
Step 4: Remove the Prime Plug Carefully
Loosen the plug slowly. If water immediately flows out, the pump may still have partial prime. If only air escapes, the pump has lost prime completely. Set the plug aside with the gasket or washer intact.
Step 5: Fill the Pump Housing with Clean Water
Using a funnel or pitcher, slowly pour clean water into the prime plug opening. The water will initially drain down the suction pipe toward the well as it fills the line. Keep adding water. For a shallow well, you may use 1 to 2 gallons. For a deeper well jet pump or a longer suction line, you may need 5 to 10 gallons. As water source: a 100-foot well with 1.25-inch pipe holds roughly 5 to 8 gallons in the suction line alone.
Keep filling until water reaches the top of the opening and holds steady without draining. When the level stops dropping, the suction line is full and you have displaced the air.
Important: If water drains away immediately and never fills up no matter how much you add, you likely have a leaking or open foot valve, meaning water is draining straight back down the well. This is a sign the foot valve needs replacement, not a reason to keep pouring water indefinitely.
Step 6: Replace and Seal the Prime Plug
Reinstall the prime plug snugly. Apply fresh Teflon tape to the threads if the old tape is worn or if the plug has leaked before. Hand-tight plus a quarter turn with a wrench is sufficient. Do not overtighten, as this can crack the pump housing.
Step 7: Restore Power and Start the Pump
Turn the breaker back on. The pump should start automatically once the pressure switch triggers. Watch the pressure gauge.
Within 15 to 30 seconds, you should see pressure begin to climb. Water at the open faucet will come out sputtering at first as the remaining air purges, then transition to steady flow. This is normal.
Step 8: If Pressure Does Not Build, Repeat the Fill
If the gauge does not move within 2 to 3 minutes, turn the breaker back off and repeat steps 3 through 6. Some suction lines need two or three fill attempts to fully purge air, especially if the line is long or the water was low. Top off the housing each time.
Step 9: Confirm Stable Pressure and Close the Faucet
Once pressure builds steadily and water flows without sputtering, close the open faucet. The pump should reach its cut-off pressure (typically 50 to 60 PSI on most residential systems) and shut off automatically. If it cycles off and holds pressure without dropping, priming is successful.
How to Prime a Well Pump With a Pressure Tank
Many people search specifically for how to prime a water pump with a pressure tank because they are unsure whether the tank changes the process. The short answer is that you prime the pump housing, not the pressure tank itself.
A few details specific to setups with a pressure tank:
- Keep a faucet or hose bib open during priming so air can escape from the system. Without an exit, trapped air may prevent the pump from building pressure even after priming.
- If the pump primes successfully (pressure builds, water flows) but then short-cycles rapidly (the pump clicks on and off quickly), the issue is not the prime. It is the pressure tank. A waterlogged tank or a failed bladder causes rapid cycling. Check the tank’s air charge and bladder condition separately.
- After a power outage, the pressure tank may have discharged fully. The pump will need to run through several cycles to recharge the tank to normal operating pressure.
How to Prime a Well Pump After a Power Outage
Power outages are the most common reason residential jet pumps lose prime. When power is cut, the pump stops mid-cycle. If the check valve or foot valve is aging or partially worn, water in the suction line may slowly drain back down into the well over hours. When power returns, the pump runs against an air-filled line and cannot build pressure.
The fix is the same standard priming procedure described above. A few power-outage-specific considerations:
- Water source: You have no running water when the pump is offline. Useful sources for priming water include water stored in your hot water heater tank (drain a gallon or two from the drain valve at the base) or water you stored in containers beforehand.
- Self-priming pumps still may need help: Even if your pump is labeled self-priming, a check valve that leaked down significantly during a long outage may require a manual top-off to get the process started.
- Check breaker first: Before priming after a power outage, confirm the breaker did not trip. A breaker that tripped during the outage event will prevent the pump from running even after the power returns.
One practical tip from experienced well owners: keep two or three sealed gallon jugs of clean water stored near the pump. After a power outage, you have what you need to prime immediately without searching for a water source.
How to Prime a Well Pump That Has Been Sitting
If your well pump has been sitting unused for weeks or months, the water in the suction line may have drained back into the well. This is common for vacation properties, seasonal homes, and rental properties.
Checklist Before You Start:
- Check the breaker first. Make sure power is off.
- Open a faucet near the pressure tank.
- Remove the prime plug.
- Fill the pump housing with clean water.
- Keep filling until water holds steady.
- Replace the plug and restore power.
- Watch for pressure to build.
- Repeat the fill if needed.
Special Considerations:
- If the pump has been sitting for more than a year, the seals may have dried out.
- Check for visible cracks or leaks before restoring power.
- If the pump runs but does not build pressure, the seal may need replacement.
- For seasonal properties, consider installing a low water cutoff to prevent dry running.
A pump that has been sitting may need two or three fill attempts before it catches prime. Be patient and keep adding water.
How to Prime a Deep Well Pump
What “deep well pump” means varies by system, and the right approach depends on your specific setup.
If You Have a Submersible Deep Well Pump
Do not attempt to prime it manually. Submersible pumps do not require priming because they operate underwater. If you have no water, troubleshoot in this order:
- Check the breaker panel. A tripped breaker is the most common cause.
- Check the control box (if your pump has one). A control box fault will prevent the pump from starting.
- Test the pressure switch. A failed pressure switch will not signal the pump to run.
- Check the pressure tank. A waterlogged tank can mimic a pump failure.
- Check for low water cutoff activation. Some systems have a low-water shutoff that prevents the pump from running when the well level drops.
If none of these apply, the pump or drop pipe may need professional inspection. The guide on signs of well pump failure and how to catch them remotely covers the warning signs that point toward pump damage versus other system issues.
If You Have a Convertible or Deep Well Jet Pump
A convertible jet pump set for deep well operation uses two pipes: one that carries water down to an injector at depth, and one that returns water up to the pump. Both pipes must be filled with water for priming to work.
Many convertible pumps have two prime plugs, one for each pipe. Fill both completely. Because the piping is longer than a shallow well system, expect to use significantly more water and more fill attempts. If the pump catches prime but then loses it quickly, a suction-side air leak is the likely cause.
How to Prime a Well Pump Without a Pressure Tank
Some systems, particularly simple irrigation setups or transfer pumps drawing from a well, do not include a pressure tank. The priming process is the same: turn off power, fill the pump housing, seal it, start the pump. The difference is that without a pressure tank there is no air bladder system to vent. Instead, open a discharge valve or hose bib at the outlet to give air an escape path while the pump purges.
Once water flows steadily from the outlet, close it down to normal operating position.
How to Prime a Well Pump With a Garden Hose
If you have access to a water source but it is not convenient to pour directly into the prime plug, a garden hose method can work.
Using a lead-free garden hose connected to a separate water source (a neighbor’s outdoor spigot, a stored tank, or a municipal connection at another building), connect the hose to the pressure tank drain valve or a boiler drain near the pump. Open the hose slowly and allow water to flow backward through the plumbing and into the pump housing. This method works best when you can monitor pressure and has a longer setup time, but it is useful when direct pump access is limited.
Note on garden hoses: Standard garden hoses may contain traces of lead. Do not use a garden hose that is not certified as lead-free to push water into a drinking water system. Use an NSF-certified drinking water hose or a sealed water container instead.
How to Prime a Pump With No Priming Port
Some pumps do not have a traditional prime plug. This is common on newer models, self priming pumps, and some convertible jet pumps.
Methods to Prime a Pump With No Priming Port:
| Method | How It Works | Best For |
|---|---|---|
| Pressure gauge port | Remove gauge, fill housing, replace gauge | Pumps with a pressure gauge |
| Discharge port | Disconnect discharge pipe, pour water in | Pumps with accessible discharge |
| Garden hose | Connect hose to boiler drain, push water backward | Pumps with a drain valve |
| Suction port | Disconnect suction pipe, fill directly | Pumps with accessible suction |
Tips:
- Check your pump manual for the recommended priming method.
- If no port is available, a garden hose method is usually the easiest.
- Never run the pump dry while trying to prime it.
If you cannot find a way to prime the pump, contact a professional. Some pumps are designed to be self priming and may not need manual priming.
How Much Water Does It Take to Prime a Well Pump?
The amount of water needed depends on the depth to water in the well and the diameter of the suction pipe.
- Shallow well (under 25 feet), 1-inch pipe: approximately 1 to 2 gallons
- Medium depth (25 to 50 feet), 1.25-inch pipe: approximately 3 to 5 gallons
- Deep well jet pump (50 to 90 feet), 1.25-inch pipe: approximately 5 to 10 gallons
A practical approach is to fill until the level holds steady without draining, then fill once more after the first run to purge remaining air pockets. Have more water on hand than you think you need.
Why Does My Well Pump Keep Losing Prime?
A pump that keeps losing prime is telling you something is wrong beyond a simple air pocket. Repeated lost prime is a symptom, not a root problem. Work through this checklist:
1. Failing Foot Valve or Check Valve
The foot valve sits at the bottom of the suction pipe inside the well. It is a one-way valve that holds water in the pipe when the pump is off. When it fails, water drains back down the well and air replaces it, causing repeated prime loss. A foot valve test: with the pump off, disconnect the suction line at the pump and look or blow into the pipe. If air passes through freely with no resistance, the foot valve is stuck open or worn out. Replacement costs are typically $50 to $150 for the valve, but the suction pipe must be pulled from the well to access it, which usually requires a professional.
2. Air Leak on the Suction Side
Even a pinhole crack or a slightly loose fitting in the suction line between the pump and the well allows air to enter continuously. The pump primes initially, but air bleeds in and the prime degrades. To find suction leaks: inspect every joint, union, and fitting on the suction side carefully. Pay special attention to any area where pipe material changes or where a repair was made previously.
3. Low Water Level in the Well
If the water level in the well has dropped below the foot valve or the pump intake, the pump pulls air instead of water. This can happen during drought, after heavy use, or if the aquifer is declining. Understanding how to monitor well water levels over time helps identify whether drawdown is the root cause before you spend money chasing mechanical fixes.
4. Pump Ran Dry and Seal Is Damaged
If a jet pump ran dry for more than a minute or two, the mechanical seal between the impeller shaft and the pump housing may have overheated and warped. A damaged seal allows air to enter at the pump body even when the suction line is otherwise intact. Signs of a damaged seal include persistent air bubbles in the water, a pump that primes briefly and then loses pressure, or water weeping from the pump housing during operation. A damaged seal typically requires professional pump service or replacement.
5. Waterlogged Pressure Tank
When the air bladder inside the pressure tank fails, the tank fills entirely with water and the pump has to cycle on and off rapidly to maintain pressure. This rapid cycling stresses the pump and can sometimes be mistaken for a priming issue. If the pump builds pressure but cycles off within seconds and immediately back on, test the pressure tank’s air charge at the Schrader valve on the tank (with the pump off and the system depressurized). A working tank should have an air charge roughly equal to the cut-in pressure of the system.
Pump Not Priming: Troubleshooting Checklist
Use this if you have followed the priming steps multiple times without success:
- Confirm the pump is actually receiving power and the motor is spinning
- Check whether water drains immediately from the prime plug opening (foot valve failure)
- Inspect suction line fittings and connections for any visible cracks or gaps
- Verify the well has water by shining a flashlight down the casing if accessible
- Check the prime plug gasket or threads for leaks that let air back in
- Confirm the discharge side has an open faucet for air to vent during priming
- Listen to the pump: grinding or screeching sounds suggest mechanical damage from dry running
- Check the pressure gauge for any movement. No movement at all means no water is moving
If the pump is making grinding or rattling noises, do not continue running it. Stop, cut power, and call a professional. A damaged impeller or failed seal makes continued operation harmful.
Do Submersible Pumps Need to Be Primed?
The direct answer: no, submersible pumps do not need manual priming under normal circumstances. Because a submersible pump sits underwater, it is always surrounded by the medium it is designed to pump. There is no suction line to fill.
If you have replaced a submersible pump and drained the system completely, you may need to prime the pressure tank and distribution lines to purge air from the household plumbing, but this is different from priming the pump itself.
If a submersible pump is not delivering water after power is restored, the troubleshooting steps above (breaker, control box, pressure switch, pressure tank) are the right path.
What Happens If You Run a Well Pump Dry?
Running a jet pump without water for more than 30 to 60 seconds is one of the most common ways homeowners accidentally destroy a pump. The mechanical seal between the rotating shaft and the pump housing depends on water for lubrication and cooling. Without water flow, the seal overheats within seconds, warps, and fails. Once the seal fails, air enters at the pump body and the pump can never build proper prime again regardless of how much water you pour in.
Signs a pump has been damaged by dry running:
- Pump primes and builds pressure briefly, then drops
- Water weeps or drips from the pump housing during operation
- Pump is unusually loud or hot to the touch
- The pump never builds beyond low pressure even with multiple full priming attempts
If you suspect dry-run damage, stop running the pump and have a professional evaluate it. Continued operation accelerates wear and can damage adjacent components including the pressure switch and pressure tank.
How NightOwl Monitoring helps detect conditions that can lead to lost prime
Lost prime is often the end result of a chain of events that began well before the pump stopped delivering water. Pressure anomalies, extended pump run times, and unusual cycling patterns all precede a prime loss event in most cases, and they are detectable with the right monitoring.
NightOwl Monitoring gives well owners and well service contractors real-time visibility into the signals that typically precede a prime loss or pump failure:
- Pressure drop trends that suggest a developing suction-side air leak
- Extended pump runtimes that indicate the pump is struggling to move water, often because it is pulling against a partially air-filled line
- Rapid cycling patterns that point to a waterlogged pressure tank before it causes pump stress
- Water level data that shows when the well is drawing down to the point where the pump may pull air
- Automated alerts when readings leave normal operating ranges, enabling a service call before the homeowner loses water entirely
For residential well owners, this data means fewer emergency calls and less risk of dry-run damage. For well drilling and service contractors, it means the ability to address problems proactively rather than only when a customer calls with no water. Explore what NightOwl monitoring systems are built to solve for well owners and service professionals.
Frequently Asked Questions
How do I prime a well pump fast?
Turn off the breaker, open a nearby faucet, remove the prime plug, fill the pump housing slowly with clean water until the level holds, replace the plug snugly, restore power, and watch the pressure gauge. Most shallow well jets prime in under 15 minutes. If it does not catch prime on the first attempt, refill and try again. Two to three attempts clears most suction lines.
How much water does it take to prime a well pump?
Between 1 and 2 gallons for a shallow well under 25 feet. Between 5 and 10 gallons for a deep well jet pump with longer suction lines. Have more than you expect to need, and keep filling until the level holds steady at the prime plug opening without draining.
Why does my well pump keep losing prime?
The most common causes are a failing foot valve that does not hold water in the suction line, an air leak in the suction pipe fittings, low water level in the well, or a damaged pump seal from a prior dry-run event. Priming treats the symptom. Finding and fixing the underlying cause stops the recurrence.
Do I have to prime a submersible well pump?
No. Submersible pumps sit underwater in the well and do not require manual priming. If a submersible pump is not delivering water, troubleshoot the breaker, control box, pressure switch, and pressure tank rather than attempting to prime the pump.
How do I prime a well pump with a pressure tank?
The process is the same as priming a standard jet pump. Fill the pump housing through the prime plug, not the pressure tank. Keep a faucet open during priming to vent air. If the pump primes but then short-cycles rapidly, the issue is the pressure tank’s air bladder, not the prime.
What does priming the pump mean?
Priming a pump means filling the pump housing and suction pipe with water so the pump can create the suction needed to draw water from the well. Without water in the system, the pump spins against air and cannot move water through the plumbing.
Can I prime a well pump with a garden hose?
Yes, using a lead-free or NSF-certified drinking water hose connected to an external water source. Connect to a boiler drain or pressure tank drain valve and push water backward into the system. This method is useful when direct access to the prime plug is limited, but direct filling through the prime plug is faster and more reliable when accessible.
Final Takeaway
Knowing how to prime a pump for well water puts you in control of one of the most common and fixable well problems a homeowner faces. The process is consistent across most jet pump setups: cut power, fill the housing, seal it, restore power, vent air from an open faucet, and watch for steady pressure.
The more important skill is recognizing when repeated prime loss points to a root problem that priming alone will not fix, whether that is a failing foot valve, a suction-side air leak, or a declining water level. Those problems have lasting solutions when caught early.
If your pump keeps losing prime despite correct priming technique, or if you want to monitor the early warning signs before the water stops, NightOwl Monitoring provides the real-time well system data that gives you that early warning.