
 ChatGPT
 Perplexity
 Claude
 Gemini
 Grok
Grok
A sand point water well also called a sandpoint well, driven point well, drive point well, or simply a point well is a shallow well built by driving a small-diameter pipe with a screened tip into the ground until it reaches a water-bearing layer of sand or gravel. No drilling rig is required. Instead of boring a large borehole with heavy equipment, a sand point well uses a hardened drive tip and a well screen to tap into near-surface groundwater from above.
If you live in a rural area or own a seasonal property, you may have heard about sand point wells. They are one of the oldest and simplest ways to access groundwater. They cost far less than drilled wells, and in the right conditions, they can supply water for irrigation, livestock, or even a modest household.
At NightOwl Monitoring, we work with well owners, drillers, and property managers across the country, and sand point wells represent one of the most common shallow water supply systems we encounter. They are practical, affordable, and highly geology-dependent, which means understanding them properly saves a lot of time, money, and frustration before you commit to one.
TThis guide covers everything you need to know about what is a sand point water well, how it works, realistic depth expectations, pump options, and how it compares to a drilled well.
Key Takeaways
- A sand point well is a shallow, small-diameter driven well that works only in sandy, permeable soils with a high water table.
- Standard pipe sizes are 1.25 inches for water depths under 20 feet and 2 inches for depths between 20 and 50 feet. Most installations reach 15 to 30 feet under typical conditions.
- Sand point wells are best suited for irrigation, seasonal properties, livestock, and light outdoor use. Full household use is possible in the right conditions but requires careful evaluation of yield and water quality.
- The driven pipe and screen have a practical lifespan of roughly 10 to 25 years, shorter than a properly drilled and cased well.
- Sand point wells are more susceptible to surface contamination than deep drilled wells and require annual water testing if used for drinking.
- A sand point well will not work in clay, rock, or hardpan. Soil conditions must be right before installation.
- Performance can shift seasonally as shallow water tables rise and fall. Monitoring pressure and water level trends helps protect the pump in these systems.
What Is a Sand Point Well?
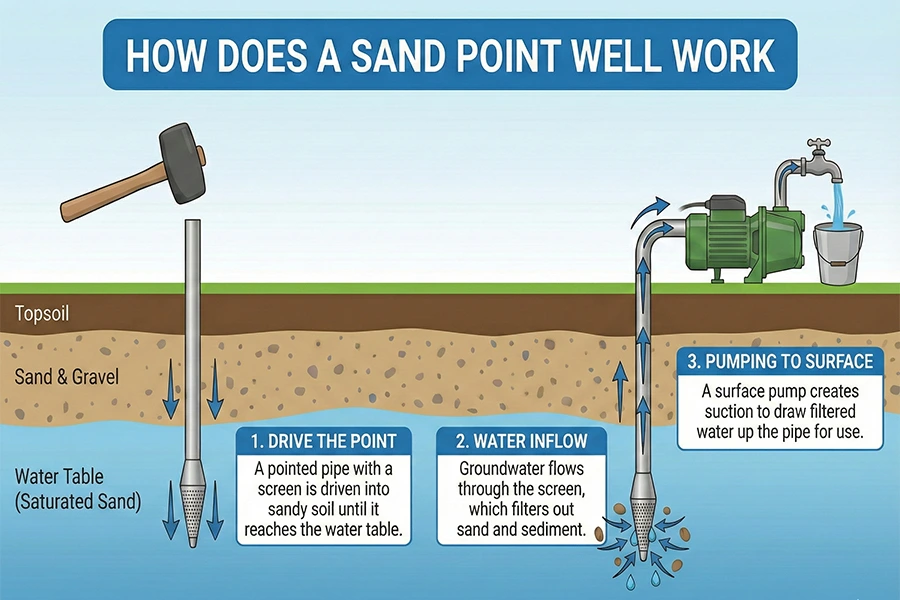
A sand point well is built from sections of threaded steel pipe, typically 1.25 or 2 inches in diameter, connected end to end as the well is driven deeper into the ground. At the bottom of the pipe string sits the well point: a hardened steel tip that protects the screen during driving and helps penetrate the soil. Immediately above the tip is the well screen, a slotted or perforated section that allows groundwater to enter while blocking most sand and fine particles.
Once the screen reaches a productive water-bearing layer, groundwater moves through the screen slots and up the pipe to a pump at the surface.
You will find this type of well called by many names depending on the region:
- Sand point well or sandpoint well
- Driven point well or drive point well
- Point well or point driven well
- Well point system
- Driven well or pipe well (used loosely)
- Sand pipe well
All of these generally refer to the same concept: a small-diameter pipe driven into shallow groundwater, using a screened intake to filter the water as it enters the system.
How Does a Sand Point Well Work?
Understanding how a sand point well works helps you evaluate whether it is the right fit for your property and how to troubleshoot it when something changes.
The physics is straightforward. Shallow aquifers consist of permeable materials, sand, gravel, or coarse silt, where groundwater fills the spaces between particles. When a pump runs, it creates a pressure difference that draws water toward the screen from the surrounding formation. Water passes through the screen slots into the pipe and travels upward to the pump.
This process depends on one critical condition: the formation around the screen must allow water to move freely. Sandy soils with high permeability support good flow. Dense clay, tight silt, or rock formations resist flow so strongly that even when groundwater is technically present, the pump cannot draw enough water to meet demand.
The efficiency of a sand point well also depends on how much of the screen stays submerged below the pumping water level. When the pump runs and draws water faster than the formation can recharge, the water level inside the well drops. If it drops below the top of the screen, the pump begins pulling air, a condition called drawdown below the intake, causing loss of prime, pump strain, and potentially air-locking the system.
Key Components of a Sand Point Well System
| Component | Function |
| Drive point (well tip) | Hardened steel tip that protects the screen during driving |
| Well screen | Slotted or perforated intake section; filters water entering the pipe |
| Drive pipe sections | Threaded pipe lengths, typically 4 to 5 feet each, added as driving progresses |
| Pipe couplings | Threaded connectors joining pipe sections together |
| Shallow well jet pump | Most common pump type for depths under 20 to 25 feet |
| Pressure tank | Stores pressurized water to reduce pump cycling |
| Wellhead cap | Seals the top of the well against surface contamination |
The screen length and slot size are among the most important choices in the system. A screen with slots that are too large lets fine sand particles into the water supply, which damages the pump and clogs filters. A screen with slots that are too small restricts flow and reduces yield. Screen selection should match the particle size distribution of the formation where the screen is set.
Sand Point Well Diagram: What It Looks Like Underground
From top to bottom, a sand point well installation looks like this:
At the surface, the pipe exits the ground and connects to the pump and pressure tank setup, typically inside a pump house, basement, or above-ground enclosure. Below grade, sections of galvanized or stainless steel drive pipe run straight down. At the lower section, the slotted well screen begins, surrounded by the water-bearing sand or gravel formation. At the very bottom, the hardened drive tip completes the assembly.
The total length of pipe in the ground is the well depth. The screen, typically 18 inches to 3 feet long, is the only section where water can actually enter the system. Everything above it is sealed pipe carrying water upward to the pump. To understand how this fits into the full picture of a home water supply, the guide on how does well water work in a house explains how the well, pump, pressure tank, and plumbing connect from the aquifer to the tap.
Where Sand Point Wells Work and Where They Do Not
Sand point wells are highly geology-dependent. The same installation that produces 5 to 10 gallons per minute in sandy coastal soils will produce nothing in clay-heavy glacial till two counties over.
Conditions that support a sand point well
- Sandy or gravelly soils with high permeability and water transmission capacity
- High water table with the saturated zone within 25 feet of the surface for 1.25-inch pipe, or 25 to 50 feet for 2-inch pipe
- Consistent shallow aquifer that does not drop significantly during dry seasons or drought
- Locations with established neighborhood well history showing productive shallow wells nearby (neighbors with functioning sand point wells are the best local evidence)
Conditions that rule out a sand point well
- Clay-heavy soils: clay does not allow the pipe to penetrate cleanly and restricts groundwater flow to the screen even when water is present
- Rock, boulders, or hardpan: the drive tip cannot penetrate and will be damaged trying
- Deep water tables: if the static water level is more than 25 feet below ground, a 1.25-inch point cannot work at all; a 2-inch point may function up to about 50 feet in ideal conditions, but becomes harder to install
- Highly variable seasonal water tables: if the shallow aquifer drops significantly in late summer, the well may go dry or produce inadequate flow during peak demand periods
Before installing a sand point well, contact your county extension office, local water district, or state geological survey for information on shallow aquifer depth and productive zones in your area. Talking to neighbors with existing sand point wells in the same area gives the most practical data on what to expect.
Sand Point Well Depth: What the Numbers Mean
Sand point well depth is one of the most searched questions about this type of system, and the answer has two parts: how deep you can physically drive the pipe, and how deep you need to drive it to reach productive water.
Standard pipe size guidance by depth:
| Pipe Diameter | Practical Depth Range |
| 1.25 inch | Up to 20 to 25 feet (limited by suction physics; a shallow well pump cannot lift water from depths greater than about 20 to 25 feet) |
| 2 inch | 25 to 50 feet in ideal sandy conditions |
Most hand-driven sand point installations in residential and farm settings fall between 15 and 30 feet. Under ideal conditions with powered driving equipment and very permeable soil, depths up to 50 feet are achievable, though this is less common in typical DIY or small-property installations.
The physics limit on shallow well pumping is atmospheric pressure. At sea level, a perfect vacuum can only lift water approximately 25 to 28 feet. In practice, with friction losses and imperfect vacuum, the real-world pumping lift limit for a standard shallow well jet pump is closer to 20 to 22 feet. This is why deeper sand point setups require 2-inch pipe and more powerful pump configurations.
The depth goal is not simply to reach water. It is to place the screen deep enough below the static water level that the well can produce under pumping drawdown without pulling air. A general rule of thumb from well professionals: the screen should be at least 5 to 10 feet below the static water table to provide a usable buffer during pumping.
Sand Point Well vs. Drilled Well: A Clear Comparison
| Factor | Sand Point Well | Drilled Well |
| Typical depth | 15 to 50 feet | 50 to 400+ feet |
| Installation method | Hand or mechanical driving; no drill rig | Rotary or percussion drill rig |
| Typical installation cost | $300 to $1,500 (DIY to professional) | $5,000 to $15,000+ depending on depth |
| Yield | Generally lower; 1 to 5 GPM typical | Often higher; varies by aquifer |
| Lifespan | 10 to 25 years (pipe and screen) | 30 to 50+ years (casing and borehole) |
| Contamination risk | Higher; shallow aquifer is closer to surface | Lower; deep casing and grout seal |
| Works in clay or rock | No | Yes, with proper equipment |
| Seasonal reliability | Variable; depends on water table stability | More consistent; draws from deeper aquifer |
| Best use case | Irrigation, seasonal, light outdoor use | Full household supply, long-term reliability |
| Required soil type | Sandy, permeable | Adaptable to most geology |
The most important difference in daily use is contamination risk. A sand point well sits in shallow groundwater that is directly influenced by what happens at the surface: agricultural runoff, septic system leachate, petroleum spills, and road salt can all reach a shallow aquifer much faster than a deep, grouted drilled well. For any drinking water application, this makes regular testing and proper wellhead protection non-negotiable. Anyone weighing the full financial picture of their water supply options will also find it useful to compare city water vs. well water costs before deciding which direction makes the most sense for their property.
How Long Does a Sand Point Well Last?
Driven sand point wells generally have a shorter productive lifespan than drilled wells. The pipe and screen are typically made of galvanized steel, which is subject to corrosion over time, particularly in groundwater with low pH, high mineral content, or aggressive chemistry. Mineral scale and fine silt also accumulate on and inside the screen over years of use, gradually reducing flow.
A well-maintained sand point well in favorable conditions can remain productive for 15 to 25 years. In more aggressive water conditions or with heavier use, the screen may become significantly restricted within 10 years. Signs that a sand point well is nearing the end of its useful life include a progressive decline in yield that does not respond to flushing, increasing sand content in the water, and pump performance that deteriorates despite pump maintenance.
When the screen plugs beyond what development (flushing and surging) can restore, the practical solution is usually driving a new point nearby rather than rehabilitating the original. Because the pipe investment is relatively low compared to a drilled well, replacement is often more economical than extended rehabilitation.
Pump Options for Sand Point Wells
The right pump for a sand point well depends primarily on the depth to the pumping water level and the volume of water needed.
Shallow well jet pump
A shallow well jet pump is the standard choice for sand point systems where the pumping water level stays within 20 to 25 feet of the surface. These above-ground pumps are relatively straightforward to install and maintain, require priming if they lose their water column, and connect directly to a pressure tank. They are well-suited for irrigation systems, outdoor faucets, and light household supply.
Deep well jet pump (two-pipe configuration)
For depths between 25 and 50 feet, a convertible or deep-well jet pump configuration uses two pipes: one to push water down to a venturi injector at depth, and one to return water to the pump. This configuration is more complex to install and prime, but it extends the operational depth range of a surface-mounted pump.
Hand pump kits
Many sand point well kits include a hand pitcher pump. These are practical for gardens, cabins, livestock watering, and backup water supply. They work at low flow rates without electricity, making them reliable for emergency or off-grid situations where modest output is acceptable.
Pressure tank
Regardless of pump type, a properly sized pressure tank reduces pump cycling, extends pump life, and stabilizes pressure throughout the system. An undersized tank causes the pump to cycle on and off rapidly, which is one of the leading causes of early pump failure in sand point well systems. If you are unsure how a pressure tank fits into the overall water delivery system, the breakdown on how a pressure tank for a water well works covers the mechanics clearly.
Sand Point Well Kit: What You Are Buying
When people search for a sand point well kit, they are typically looking at packaged assemblies that include the drive point, screen, several lengths of pipe, couplings, and sometimes a drive cap to protect the top of the pipe during driving. Kits simplify the parts-sourcing process for a DIY installation.
Standard kit configurations:
- 2-inch sand point well kit: The most popular size for properties where the water table is more than 15 to 20 feet deep or where higher yield is needed. The larger diameter provides more screen surface area and better flow rates.
- 1.25-inch kits: Lighter, easier to drive by hand, and sufficient for water tables within 15 to 20 feet of the surface.
- Kits with hand pump: Include a pitcher pump or similar hand-operated pump for low-tech, low-volume applications.
- Canadian Tire and similar retail kits: Available in Canada and some northern US regions, these are standard 2-inch systems suited to the sandy glacial soils common in those areas.
Screen length in a kit typically ranges from 18 inches to 36 inches. A longer screen provides more intake surface area and reduces the velocity of water entering the screen, which helps keep sand out and maintains better flow over time.
Water Quality and Safety Considerations
Sand point wells draw water from shallow aquifers that are vulnerable to surface-derived contamination. This does not mean the water is automatically unsafe, but it does mean that responsible management requires more attention than deeper drilled systems.
For any drinking water use, the following apply:
- Annual water testing is the minimum. Test for total coliform bacteria, E. coli, nitrates, and pH. In agricultural areas, also test for pesticides, herbicides, and nitrates from fertilizer.
- Proper wellhead protection: the well cap must be intact and sealed, the casing must extend at least 12 inches above the ground surface, and the ground around the well should slope away to prevent runoff from pooling at the casing.
- Setback distances from contamination sources: most state codes require minimum separation distances between a drinking water well and septic systems, fuel storage, chemical storage, and animal enclosures. Check your state’s specific requirements before siting the well.
- Backflow prevention on any hose connections to the system prevents irrigation water or other outdoor sources from being siphoned back into the well supply.
For irrigation-only use, water quality still matters. High sediment content damages pump impellers and clogs sprinkler heads. Iron and manganese stain equipment and structures. If you are unsure whether your shallow well water is safe for household use, the guide on is well water safe to drink covers the key risks and testing steps for private well owners.
How to Tell If a Sand Point Well Will Work on Your Property
Before driving pipe and spending money on equipment, evaluate these factors.
Talk to Neighbors
The best local evidence is a functioning sand point well nearby. If neighbors at similar elevation and soil conditions have productive driven wells, yours has a good chance of working. If they do not, that is meaningful information.
Research Local Geology
County soil surveys available from the USDA Web Soil Survey, state geological surveys, and county water district records often show what is below the surface. Sandy, glaciofluvial deposits and coastal plain soils are prime territory. Glacial till, clay heavy sediments, and upland rocky areas are poor candidates.
Check Your Water Table Depth
Your local county extension office, state environmental agency, or a nearby well driller can tell you approximate depth to groundwater in your area. If it is consistently more than 25 feet below ground, a 1.25 inch system will not work. A 2 inch system becomes the minimum, with success less certain.
Assess Seasonal Variation
A water table that is at 10 feet in spring but drops to 30 feet by late summer creates a well that may work only part of the year. Neighbors who have used their sand point wells across multiple seasons can tell you whether seasonal yield has been a problem.
Consider Your Use Case Honestly
If you need water only for irrigation or a seasonal cabin with moderate demand, a sand point well that produces 2 to 5 gallons per minute may be completely adequate. If you need to supply a full household with multiple bathrooms, washing machines, and dishwashers, a sand point well may fall short in both yield and long term reliability.
Installing a Sand Point Well: A Practical Overview
The installation sequence for a DIY or professional sand point well follows a consistent pattern. Local regulations, setback requirements, and permit rules vary by state and county. Verify requirements with your local health department or water authority before starting.
Step 1: Choose the Location Carefully
Observe required setback distances from septic systems, typically 50 feet minimum and often more. Also check distances from fuel storage, chemical areas, and property lines. Avoid low spots where surface water pools. Position the well where the wellhead will remain accessible for maintenance.
Step 2: Start Straight
The pipe must go in vertically. Even a small angle at the surface becomes a significant deviation at depth. This can cause driving problems and make pump installation difficult.
Step 3: Assemble and Drive the First Section
Connect the well screen to the drive point and thread the first pipe section above it. Use a drive cap on top to protect the threads. Drive down using a sliding hammer, a post driver, or a mechanical driver depending on your setup.
Step 4: Add Sections as You Go
After each pipe section is driven to within a few inches of the surface, thread on a coupling and the next pipe section. Replace the drive cap and continue driving.
Step 5: Test for Water Entry
As you approach the water table, pour water into the open top of the pipe periodically. Watch whether it quickly drops, indicating the water is draining into a productive formation. If it sits, that indicates tight soil or clay. When water poured in drops quickly and the well begins to fill on its own, the screen is in a productive zone.
Step 6: Develop the Well
Before connecting the pump, surge the well by rapidly pumping and reversing water flow to dislodge fine particles from around the screen. Continue until water runs relatively clear.
Step 7: Connect the Pump and Pressure Tank
Install a foot valve or check valve to hold water in the suction line. Connect the jet pump and set up the pressure tank and pressure switch according to the pump manufacturer’s specifications.
Step 8: Disinfect and Test
If the well will be used for any household water, shock chlorinate the system, flush thoroughly, then submit a water sample for laboratory analysis before drinking the water.
Common Sand Point Well Problems and How to Address Them
Sand in the water
Sand appearing in the water typically indicates one of three things: the screen slot size is too large for the formation, the screen is damaged, or the pump is drawing the water level down far enough to pull formation material through the screen at higher velocity. Reducing pump demand, adding a sediment pre-filter, or in persistent cases replacing the screen with a finer slot size addresses the root cause. Sand is damaging to pump impellers and should not be ignored as a permanent condition.
Low yield or well going dry
A declining yield is usually a seasonal drawdown issue in shallow aquifers, a screen that is beginning to scale and plug, or a pump that is drawing the water level below the screen intake. Driving the screen deeper (if conditions allow), reducing demand on the system, or allowing the well to recover between pumping cycles are the first responses. Persistent low yield in a well that once produced adequate water usually points to screen plugging and may require a new point.
Loss of prime
Jet pumps serving sand point wells lose prime when the pumping water level drops below the screen intake (pulling air), when a suction-side fitting develops a small air leak, or when the foot valve fails to hold water in the line. Addressing the root cause rather than simply repriming is important, because a well that repeatedly loses prime signals an underlying problem rather than a one-time event.
Pressure fluctuations
Unstable pressure from a sand point well system is most often a waterlogged pressure tank, a failing pressure switch, air entering the suction line, or a pump that is beginning to wear. Check the pressure tank air charge first, then work systematically through the other components.
Seasonal yield changes
Expect a sand point well to produce less water during late summer and drought periods when the shallow water table drops. This is a natural characteristic of shallow systems, not a sign of failure. Planning higher-demand activities for wetter seasons and sizing irrigation systems for reduced flow during peak summer dry periods manages this limitation practically.
How NightOwl Monitoring Supports Sand Point and Shallow Well Systems
Sand point wells are more sensitive to operating conditions than deeper drilled systems. The water table can shift noticeably with seasonal precipitation. Pump cycling can increase as summer drawdown reduces the available water column above the screen. Small pressure changes that would go unnoticed in a deep well can signal the beginning of a problem in a shallow one.
NightOwl Monitoring gives well owners and contractors real-time visibility into the operational patterns that matter most for shallow-well protection:
Water level trends reveal whether seasonal drawdown is approaching the pump intake, allowing you to reduce demand or adjust the system before the pump runs dry and loses prime.
Pressure monitoring catches the early signs of screen plugging (gradually declining flow at stable pump runtime), tank bladder failure (rapid cycling), and suction-side air leaks (pressure that fails to hold between cycles), all of which are more frequent in sand point systems than in deeper wells.
Pump runtime and cycling data shows whether the pump is working harder than usual to maintain pressure, often the first measurable sign of a developing problem before it becomes a no-water event.
Automated alerts mean that a property owner or service contractor knows when readings leave normal operating ranges, enabling a planned service call rather than an emergency trip. For seasonal or remote properties where the well is not checked regularly, this is particularly valuable. If you are a well drilling or service contractor interested in offering monitoring to your customers, the NightOwl partner program is built specifically to help service companies add remote monitoring as a recurring revenue service.
Frequently Asked Questions
What is a sand point well?
A sand point well is a shallow well built by driving a small-diameter pipe with a screened intake and hardened tip into sandy or gravelly soil until it reaches groundwater. No drilling equipment is needed. Water enters through the screen and travels up the pipe to a surface pump.
What is a point well?
A point well, driven point well, or drive point well are all names for the same thing as a sand point well. The term refers to the drive point and screen assembly at the bottom of the pipe string.
How deep is a sand point well?
Most sand point wells are installed between 15 and 30 feet deep under typical conditions. A 1.25-inch pipe system is limited by pump physics to approximately 20 to 25 feet. A 2-inch pipe system can reach 25 to 50 feet in good sandy conditions. The goal is not simply to reach the water table, but to place the screen deep enough below it that the well can sustain pumping without pulling air.
How much water does a sand point well produce?
Yield depends heavily on the permeability and thickness of the formation around the screen. In productive sandy aquifers, yields of 3 to 10 gallons per minute are achievable. In marginal conditions, 1 to 2 GPM is more realistic. Yield also varies seasonally as the water table changes. A sand point well in clay or tight silt may produce almost nothing regardless of depth.
Will a sand point well work in clay?
No. Clay soils do not allow the pipe to penetrate easily, and the low permeability of clay means groundwater cannot flow freely to the screen even if water is technically present. Clay also forms a tight seal around the pipe that restricts what little water might be there. Sand point wells require permeable sandy or gravelly soil.
How long does a sand point well last?
A well-maintained sand point well in favorable conditions typically remains productive for 15 to 25 years. Corrosion of the galvanized steel pipe and screen, mineral scale buildup, and silt accumulation on the screen gradually reduce performance over time. In aggressive groundwater chemistry, the practical lifespan may be shorter. Driving a new point when the old one becomes restricted is generally more cost-effective than attempting to restore a fully plugged screen.
Is a sand point well good for a whole house?
It depends entirely on yield and water quality. In areas with consistently productive shallow aquifers, a sand point well can supply a modest household. In areas with lower yield, seasonal water table variability, or water quality concerns (coliform, nitrates, iron), the limitations of a shallow system make a drilled well a more reliable long-term investment for full household supply. Evaluating local data and getting a water test before committing is essential.
What is the cost of a sand point well?
DIY installation using a purchased kit runs from approximately $300 to $800 in materials for the pipe, screen, pump, and basic fittings. A professionally installed sand point well system with pump and pressure tank typically costs $1,000 to $2,500 depending on depth, soil conditions, and regional labor rates. These figures are lower than drilled well costs but come with the yield and lifespan limitations described above.
Final Takeaway
A sand point water well is a shallow, low cost water source that works exceptionally well when the geology cooperates. This means sandy or gravelly soils with a water table close to the surface. For irrigation, seasonal properties, livestock watering, and light outdoor use, a sand point well can deliver reliable performance at a fraction of the cost of a drilled well.
The limitations are real. Lower yield than most drilled wells. Greater susceptibility to surface contamination. Shorter lifespan. Seasonal variability in shallow aquifers. Understanding these trade offs clearly before installation prevents the disappointment of a system that technically works but fails to meet actual needs.
At NightOwl Monitoring, we help well owners and contractors stay ahead of these challenges with real time monitoring of water level, pressure, and pump performance. Understanding how your sand point well behaves over time is the key to protecting your investment.